On-premises relay servers
An on-premises relay is a TURN server you run. Connect sends Fluid connection traffic through it on UDP ports you choose, so you control the path, firewall rules, and QoS. Use one when relayed traffic must run through servers you control.
- It carries connection traffic only. Computers still sign in to Jump and get relay settings from a Connect Configuration. To run without the cloud, see Choose a connectivity option.
- Traffic is end-to-end encrypted. The relay can't decrypt it.
Applies to
- Jump Desktop for Teams Enterprise plan.
- Team administrators.
- Fluid connections to computers running Jump Desktop Connect on Windows, macOS, or Linux (beta). Client devices need no setup.
Before you start
- A Linux server with Docker installed. The relay is tested on CentOS, AlmaLinux, Rocky Linux, and Ubuntu.
- Quad-core or better processor, and at least 4 GB of RAM.
- Choose where the relay sits:
| Placement | Diagram |
|---|---|
| Outside your network, on a public IP | 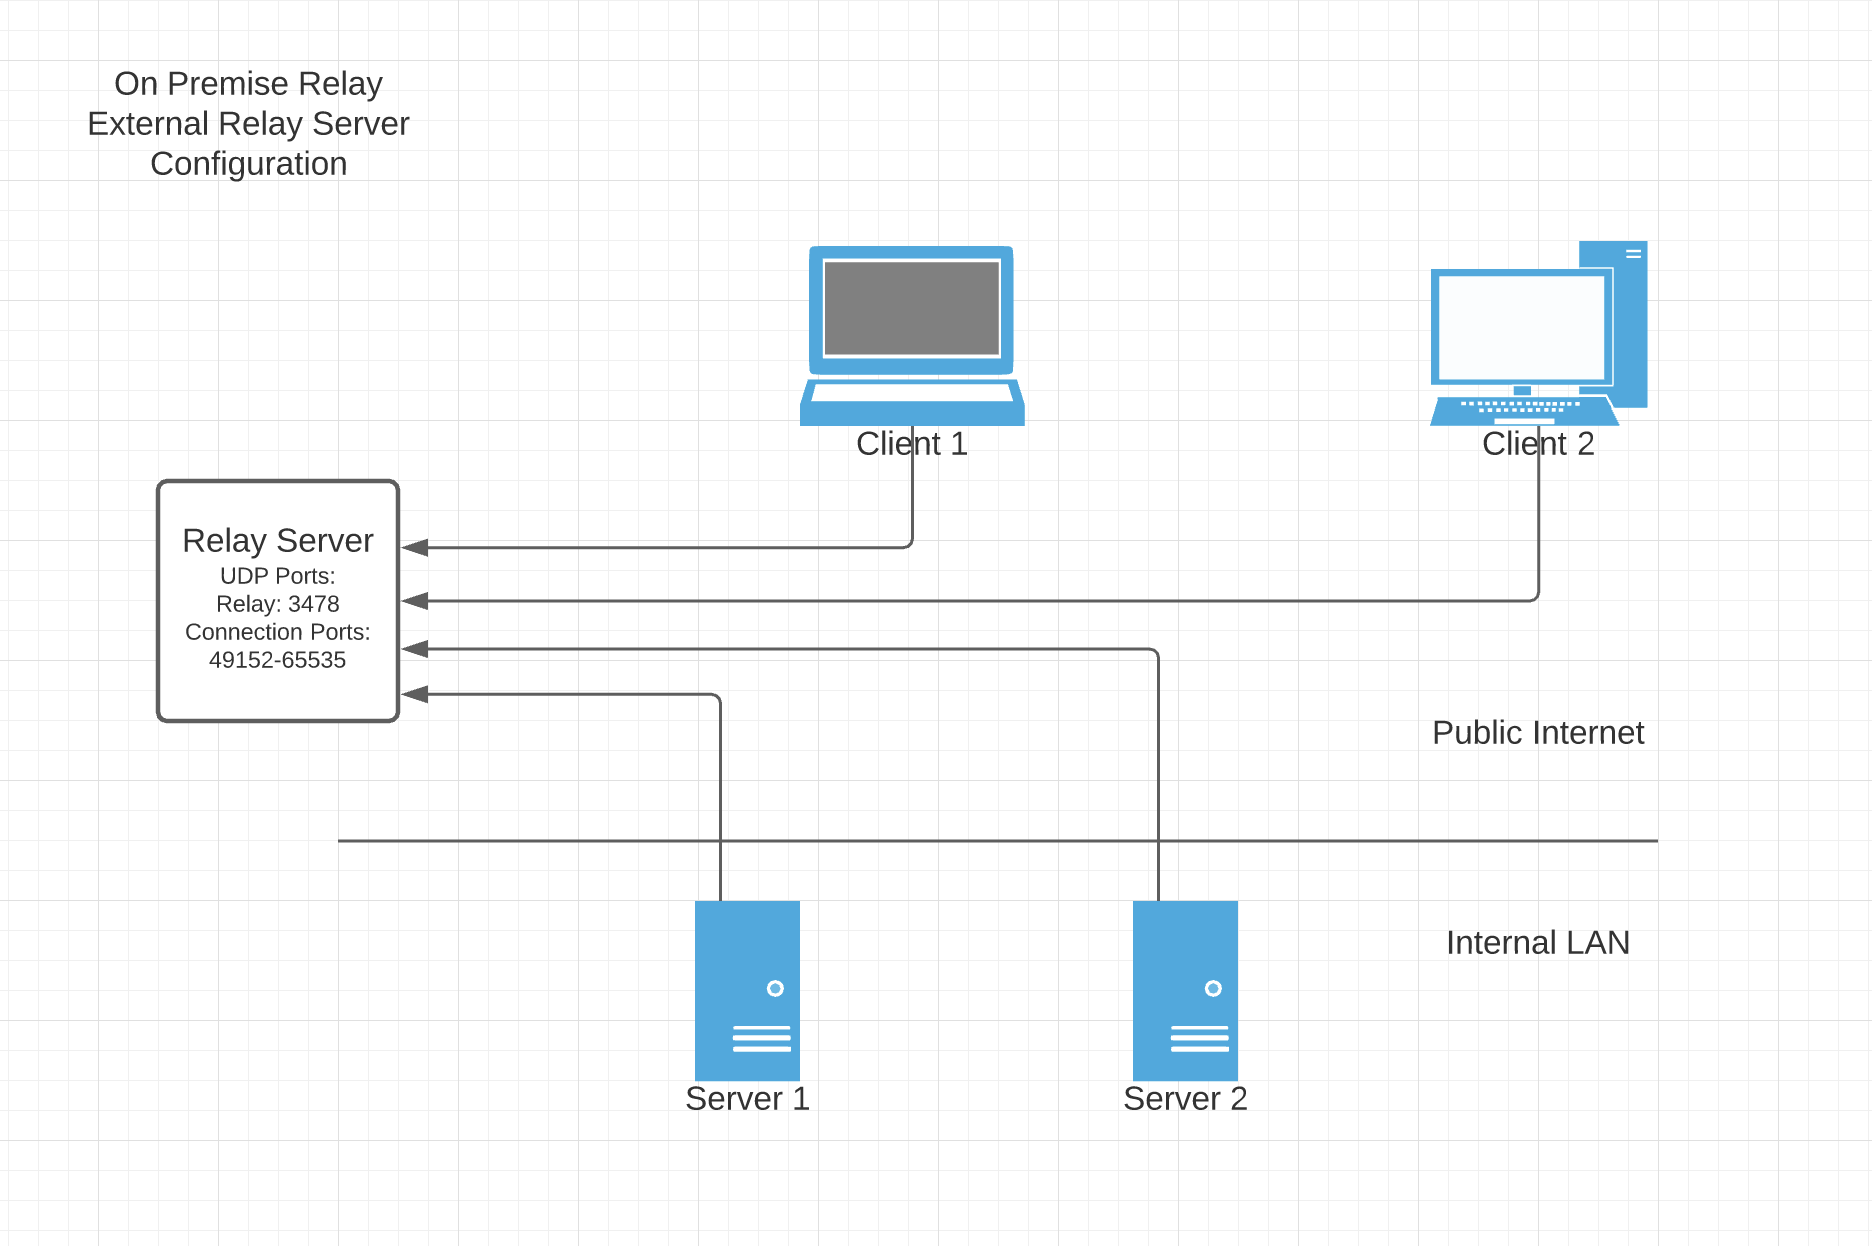 |
| Inside your network, behind NAT | 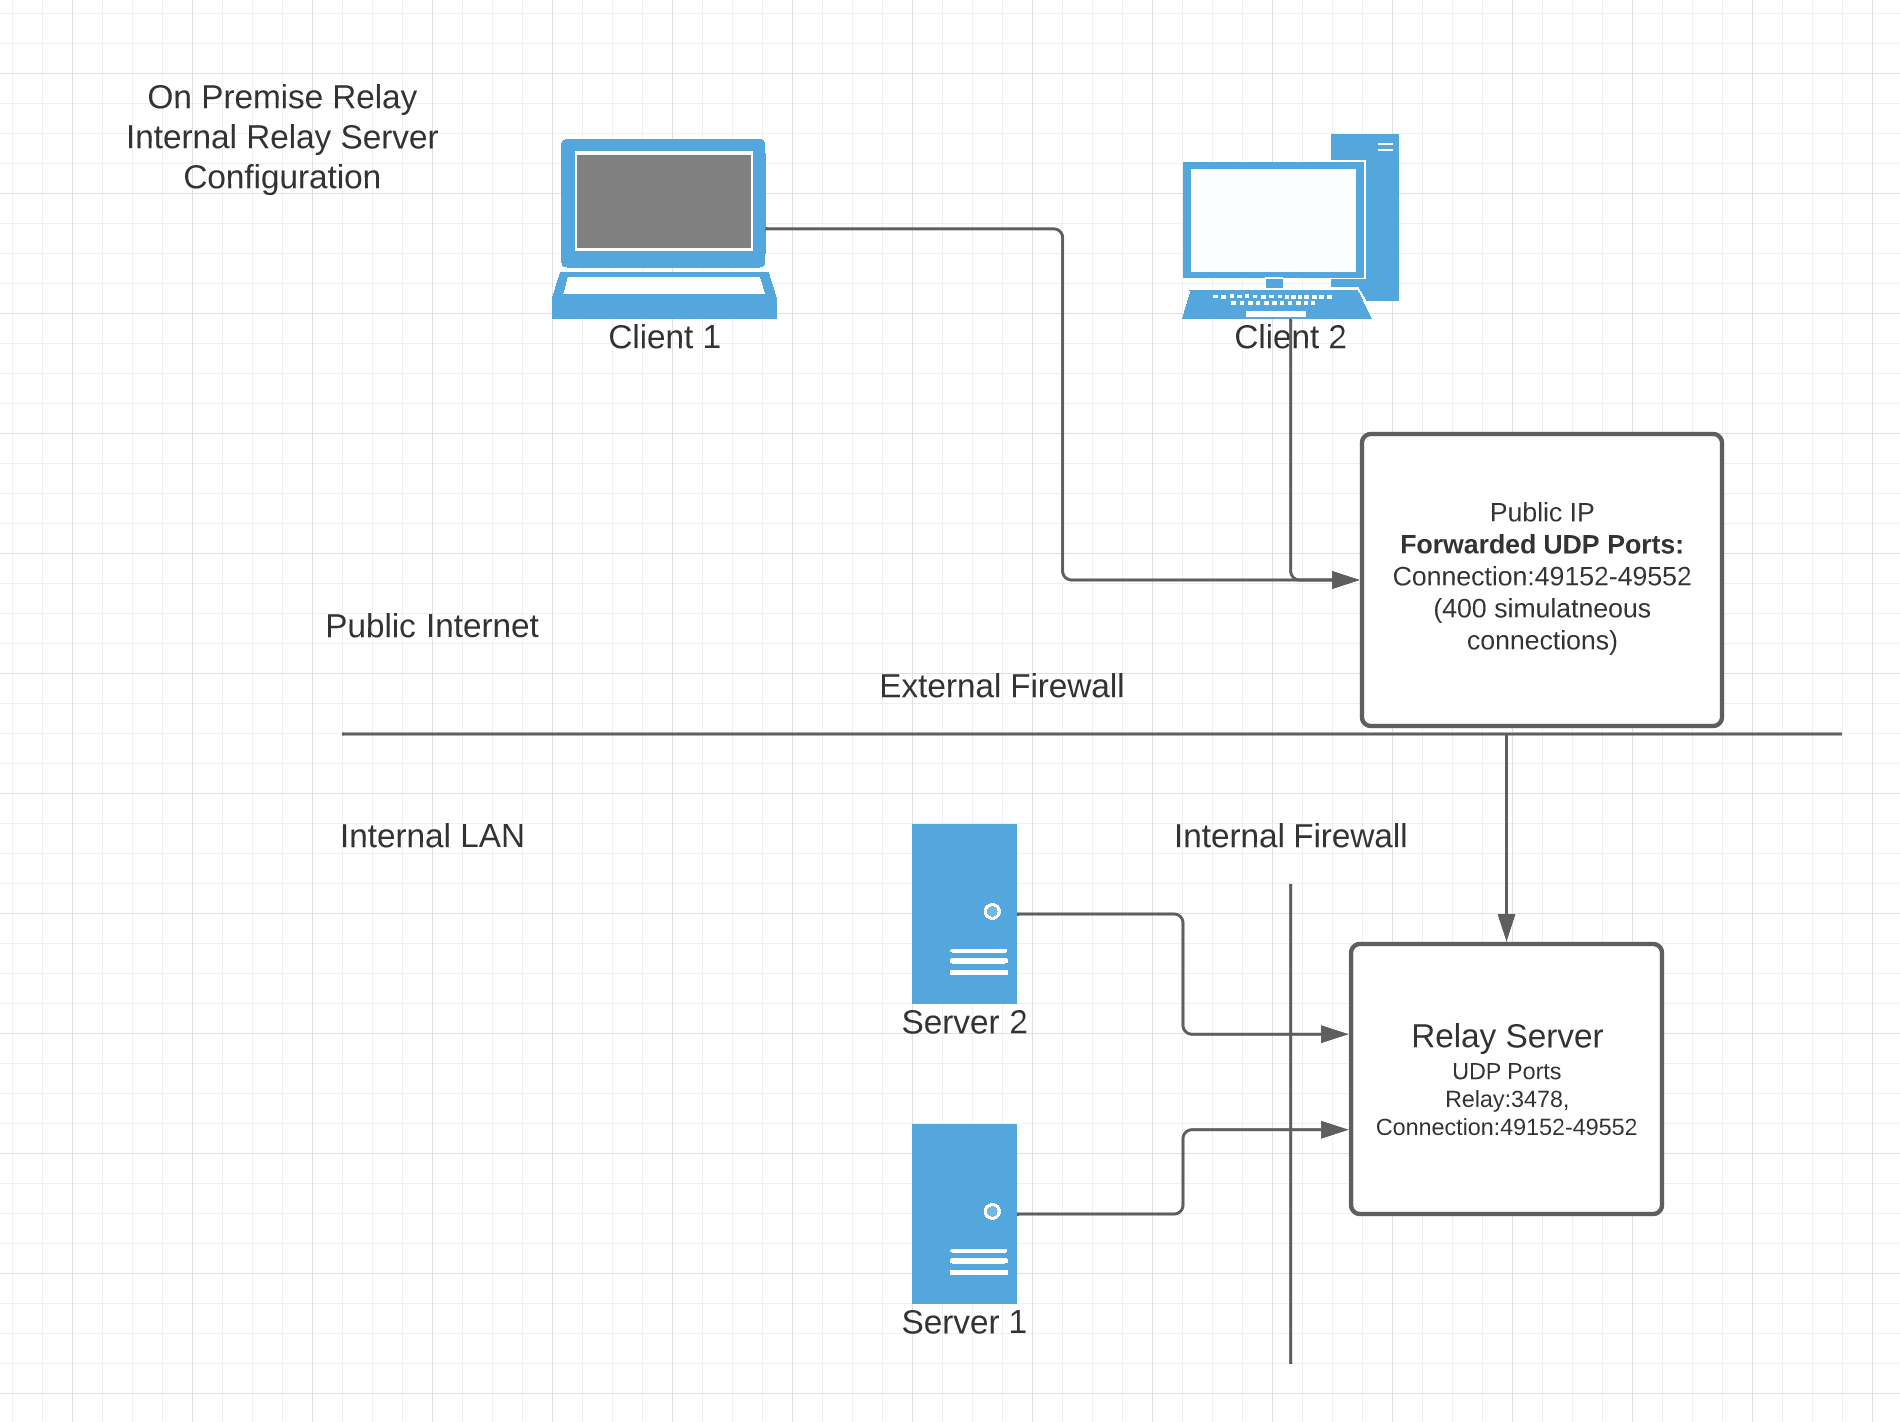 |
1. Run the relay server
The relay uses the open-source coturn TURN server in Docker.
- Pick a relay port, a username, and a strong, unique password. The credentials are copied to every computer the configuration is assigned to and are visible in the Teams dashboard.
- Pick a connection port range. Each simultaneous connection uses one UDP port from this range.
-
On the server, run the following with your values.
RELAY_EXTERNAL_IPis the server's public IP address (the NAT's public IP if the relay is behind NAT).export RELAY_PORT=3478 export RELAY_USERNAME="MyUserName" export RELAY_PASSWORD="MyPassword" export RELAY_EXTERNAL_IP=1.2.3.4 export RELAY_CONNECTION_MIN_PORT=49152 export RELAY_CONNECTION_MAX_PORT=49552 sudo docker run \ -d \ -p $RELAY_PORT:$RELAY_PORT/udp \ -p $RELAY_CONNECTION_MIN_PORT-$RELAY_CONNECTION_MAX_PORT:$RELAY_CONNECTION_MIN_PORT-$RELAY_CONNECTION_MAX_PORT/udp \ --restart=always \ docker.io/coturn/coturn \ --listening-port $RELAY_PORT \ --min-port $RELAY_CONNECTION_MIN_PORT \ --max-port $RELAY_CONNECTION_MAX_PORT \ --external-ip=$RELAY_EXTERNAL_IP \ --no-tcp-relay \ --no-cli \ --user "$RELAY_USERNAME:$RELAY_PASSWORD" \ --realm jumpdesktop.com \ --lt-cred-mech \ --pidfile /tmp/turnserver.pid
2. Open firewall ports
- On the relay server, allow inbound and outbound UDP on
RELAY_PORTand the connection port range. - If the relay is behind NAT, forward UDP on the connection port range (for example, external
49152-49552to internal192.0.2.10, ports49152-49552).
Tip
Stopping or restarting the firewall service (for example, firewalld or ufw) flushes the rules Docker creates. Run sudo systemctl restart docker afterwards to restore them.
Warning
A relay inside your network must reach only the machines that need it:
- Allow only UDP on
RELAY_PORTand the connection port range between the relay and internal machines, initiated by the internal machines. - Block TCP connections from the relay to internal machines.
- Recommended: block the relay from starting outbound UDP connections to the internet, so internet traffic reaches it inbound only on the connection port range.
3. Add the relay to a Connect Configuration
- Create or edit a Connect Configuration.
-
In Networking, click Edit next to On Premise Relay Servers.

-
In Edit Relays, click Add.

-
Enter the Username and Password you chose, and the Host as
address:port(for example,1.2.3.4:3478). Without a port,3478is used. If the relay is behind NAT, or computers reach it only on your LAN, enter its internal LAN address. Click Save.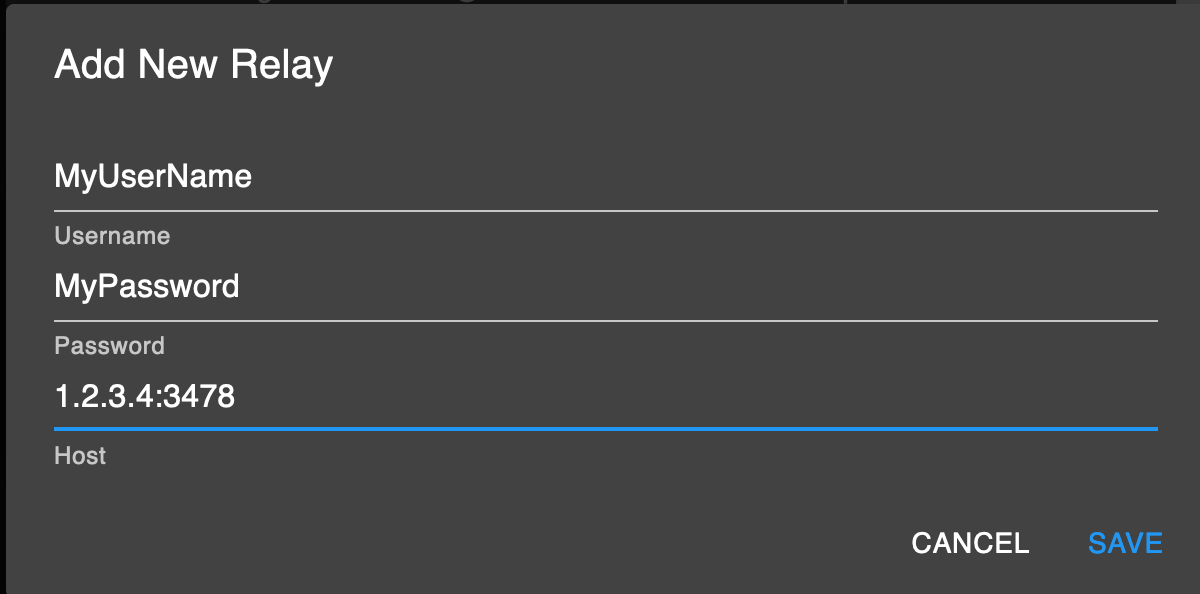
-
Optional: add a second relay, so connections still work when one is down.
- Click Close.
-
Optional: select Relay Connections Only. See Force connections through a relay.

-
Save the configuration and assign it to the computers that should use the relay.
Force connections through a relay
By default, Connect tries a direct peer-to-peer connection first and uses a relay only when that fails. Select Relay Connections Only to send every connection through a relay.
- With your relays configured, a relay-only connection uses your relays, not ones offered by the client.
How it combines with Direct Connections Only:
| Settings on | Result |
|---|---|
| Relay Connections Only | Every connection goes through a relay: your relays if configured, otherwise Jump's public relays. |
| Direct Connections Only | Connections use a direct network path only. No relays. |
| Both | Every connection goes through a relay, but Jump's public relays aren't used. Connections work only with on-premises relays configured; otherwise they fail. |
Verify connections use the relay
For a quick check on a Windows or Mac client, click Help > Show Fluid Connection Stats during a session. Connection shows Relay for a relayed connection, but not which relay.
To confirm which relay a connection uses, on a Windows or Mac client:
- Connect to a computer that has the configuration assigned.
- Click Help > Diagnostic Logs... and open the most recent log.
- Search for
Got candidate. At least one match should contain your relay's address. - If Relay Connections Only is on, search for
Using Cand. The most recent match should contain your relay's address.
Optional: reduce packet loss
Larger socket buffers on the relay host can reduce packet loss. This affects every app and container on the host.
sudo tee /etc/sysctl.d/99-jump-relay-socket-buffers.conf >/dev/null <<'EOF'
net.core.rmem_default=4194304
net.core.rmem_max=4194304
net.core.wmem_default=4194304
net.core.wmem_max=4194304
EOF
sudo sysctl --system
Reboot the host or restart the relay container. Check that all four values show 4194304:
To undo, run sudo rm -f /etc/sysctl.d/99-jump-relay-socket-buffers.conf, then sudo sysctl --system.
Limitations
- The Teams dashboard configures relays for UDP only.
- The size of the connection port range limits how many connections the relay carries at once.